Showing posts with label fruit. Show all posts

Thursday, March 25, 2021

british sponge cake


Victoria Sponge
recipe adapted from Mary Berry
makes one 8" cake or one 6" cake + 6 cupcakes 

INGREDIENTS:
2 cups self raising flour
2 tsp baking powder
1 cup sugar
2 sticks (1 cup or 225g) unsalted butter, room temperature
4 eggs, room temperature

good quality raspberry or strawberry jam
sliced/whole berries for decoration
icing sugar

METHOD:
1. Preheat oven to 350F (180C or 160C fan). Grease baking pans and line with the bottoms with a round of parchment. If making cupcakes, use a self-standing cupcake holder rather than a liner. Set aside.

2. In a small bowl, whisk together your dry ingredients. Set aside.

3. In the mixing bowl of your stand mixer, cream sugar and butter together on medium for 2 minutes until light and fluffy, scraping down the sides in-between. Add eggs in one time, fully incorporating each one and scraping down the sides.

4. On low speed, add half the flour mixture and mix until just combined, scrapping down the sides. Do not overmix. Use a spatula and pour batter into prepared pans. Only fill halfway and tap out any air bubbles.

4. Bake for 20-25 minutes until the cake is golden brown and has shrunk a little from the sides. Do not open the oven until at least 20 minutes in or else your cakes will deflate. Cakes are done when they are springy to the touch. Let cakes cool in pan for 5 minutes, then remove and transfer to a wire rack to cool completely.

5. While cakes are cooling, prepare your whipped cream frosting. Chill until ready to use.

6. To assemble, choose the cake layer with the best top, then put the other cake top-down onto a serving plate. Spread with jam, add sliced berries and then whipped cream. Place the other cake layer on top (top-side up). You can sprinkle some icing sugar or top with whipped cream and decorate with berries. Serve with extra whipped cream on the side.

Monday, March 15, 2021

easy as pie

Dutch Apple Pie
makes one 9 inch pie

INGREDIENTS:
1 unbaked frozen 9-10” pie crust (Martha Stewart's Pate Brisee)

For the Pie Filling:
1/4 cup sugar
1/4 cup flour
1 1/2 tsp ground cinnamon
1/4 tsp ground nutmeg
1/4 tsp ground cloves
1/4 tsp salt

6 apples (5 Granny Smith + 1 Fuji/Pink Lady), peeled, cored and cut into 1/4 inch slices
Zest and juice of 1 lemon
1 tsp pure vanilla extract

For the Topping:
1/2 cup brown sugar
3/4 cup flour
1 tsp cinnamon
pinch of salt
1/3 cup (75g) unsalted butter, slightly melted
3/4 cup chopped walnuts or pecans (optional)

METHOD:
1. Preheat oven to 400F (200C or 190C Fan).

2. In a large bowl, make the filling by mixing together the dry ingredients. Combine and toss in apples slices, lemon zest/juice and vanilla. Set aside.

3. In a small bowl, make the topping by mixing together the brown sugar, flour, cinnamon and salt. Use a spatula and stir in butter and nuts if using. The topping should be thick and crumbly. Set aside.

4. Remove your prepared pie crust from the freezer and spread the apple filling evenly into the crust. Sprinkle the topping evenly over the apples.

5. Bake for 20 minutes first, then rotate and place a pie crust shield on top of the pie to prevent the edges from burning. Lower the heat to 375F (190C) and bake for another 30-35 minutes.

6. Let the pie cool for 3 hours at room temperature before serving. Serve with vanilla ice cream.

Sunday, January 31, 2021

going bananas

Banana Pecan Cake
makes 1 small 7" Bundt cake

INGREDIENTS
1 cup flour
1 1/2 tsp baking powder
1/4 tsp salt
1 tsp ground cinnamon

1 stick (1/2 cup or 112g) unsalted butter, room temperature
1/2 cup brown sugar
2 eggs, room temperature
1 tsp vanilla extract
2 ripe bananas, mashed
1 cup (8 oz) sour cream
1 cup chopped pecans or walnuts (optional)

METHOD:
1. Preheat your oven to 325F (160C or 150C Fan). Grease a small 
7" Bundt or tube pan. Set aside.

2. In a small bowl, whisk together dry ingredients. Set aside.

3. In the bowl of your mixer, cream butter and sugar on high speed until soft and fluffy. Scrape down the sides with a spatula. Add eggs one at a time, beating well in between and scraping down as needed. Add vanilla, bananas and mix well.

4. Add half the flour mixture and mix on low. Add sour cream and continue to mix on low. Remove bowl from mixer and fold in remaining flour and pecans. Do not overmix.

5. Scoop batter into greased pan. Bake for 50-55 minutes or until a toothpick inserted into the cake comes out clean.

6. Cool cake in pan for 30 minutes before transferring to a wire rack to cool completely. You may need to run a knife around the pan edges to help remove the cake. Serve warm or at room temperature.

Saturday, August 15, 2020

best lemon cake

Lemon Drizzle Traybake (glazed lemon cake)
recipe adapted from Mary Berry
makes one 9 x 9" cake

INGREDIENTS
For the cake:
2 cups self raising flour
2 tsp baking powder

2 sticks (1 cup or 225g) unsalted butter, room temperature
1/2 cup sugar
4 eggs
1/4 cup milk
Zest of 2 lemons
1 tbsp finely chopped lemon verbena/lemon thyme leaves/earl grey tea leaves (optional)

For the glaze:
1/2 cup granulated sugar
Juice of 2 lemons

METHOD:
1. Preheat oven to 350F (180C or 160C fan). Grease your baking pan and line with parchment paper along the bottom and up the sides. Set aside.

2. In a small bowl, whisk together your dry ingredients. Set aside.

3. In the mixing bowl of your stand mixer, cream sugar and butter together on medium for 2 minutes until light and fluffy, scraping down the sides in-between. Add eggs in one time, fully incorporating each one and scraping down the sides.

4. On low speed, add half the flour mixture and mix until just combined. Pour in milk and remaining flower. Mix until just combined, scrapping down the sides. Do not overmix. Use a spatula and pour batter into prepared pan. Tap out any air bubbles and gently level.

4. Bake for 35-40 minutes until the cake has shrunk a little from the sides of the tin and springs back when lightly touched in the centre of the cake. While the cake is baking, make the glaze by mixing together sugar and lemon juice. Set aside.

5. Let cake cool in pan for 5 minutes. Lift out the cake with the parchment paper still attached and place on a wire rack set over a tray (to catch any drips).

6. Spoon the glaze evenly over the cake and leave to set. Do this while the cake is still warm so that the glaze soaks in properly.

7. Let cool completely before transferring cake to a cutting board to cut into squares or slices. Cake can be stored in an airtight container for 3-4 days or frozen for up to a month.

Tuesday, February 28, 2017

upside down pear cake

Upside Down Pear Cake
recipe adapted from YoungPost (April 12, 2015), SCMP.
makes one 7 inch cake

INGREDIENTS:
100ml milk
1/2 tbsp white vinegar

1/8 cup muscavado sugar
2-3 ripe pears peeled cored cut into slices

1 1/4 cups flour
1/2 cup whole wheat flour
1 tsp ground ginger
1 tsp baking powder
1 tsp baking soda
pinch of salt

2 eggs
1/4 cup muscavado sugar
50ml coconut oil
1 tsp vanilla extract

METHOD:
1. Preheat oven to 375F (190C). Lightly grease and line a 7" cake tin.

2. Mix milk and vinegar together in a bowl and set aside.

3. Sprinkle 1/8 cup sugar over the bottom of the tin. Arrange the pear slices around the tin.

4. In a small bowl, whisk together flours, ginger, baking powder, baking soda and salt. Set aside.

5. In a large bowl, combine milk vinegar mixture, eggs, 1/4 cup sugar, coconut oil and vanilla. Mix well and then fold in dry ingredients. Pour batter over pears in cake tin.

6. Bake for 30 minutes or until a tooth pick in the centre comes out clean. Allow to cool in tin on a wire rack for 10 minutes and then invert onto a plate.

Thursday, March 31, 2016

bananas and toffee

Banoffee Pie
makes one 9 inch pie

INGREDIENTS
For the toffee filling:
1 14oz (397g) can of condensed milk

For the crust:
2 cups ground digestives/ginger snaps/graham crackers (1 1/2 packages)
1/2 stick (1/4 cup or 56g) unsalted butter, melted

For the topping:
4-6 bananas
4 cups whipping cream
grated dark chocolate curls or cocoa powder (optional)

METHOD:
1. Make the toffee filling by placing the can of unopened condensed milk in a small pot. Fill the pot with enough water to reach 1/4 way up the side of the can. Bring the pot of water to a boil and then lower to a simmer for 45-60 mins. Once done, carefully remove the hot can from the pot and let cool. Set aside.

2. Meanwhile make the crust. Preheat your oven to 350F (177C). Grease a 9 inch pie plate.

3. In a small bowl, add ground biscuits and melted butter. Mix well with a fork and dump mixture into pie plate. Use the bottom of a glass to gently press the crust evenly. Apply light pressure or else your crust will be tough and crunchy.

3. Bake for 8-10 minutes until the edges brown. Transfer to a cooling rack.

4. Carefully open the cooled can of condensed milk. The condensed milk should be thickened and the colour of toffee. Spread the toffee filling gently onto the cooled crust. Chill for 1 hour (up to 8 hours) before adding the topping.
5. Make the topping by first slicing bananas on a bias into 1/2 inch pieces. Layer banana slices over the chilled pie filling.

6. In a large bowl, beat whipping cream on high speed until soft peaks form. Spread whipped cream over bananas. Top with grated chocolate or dust with cocoa (optional).

Monday, February 29, 2016

ginza

A quick weekend trip to Tokyo and we stumbled upon this little izakaya next to our hotel in Ginza. The chef fires up our meat.
And then continues to charcoal grill the rest of our dinner - chicken, beef, inards and mushrooms.
The most embellished bowl of miso soup we've ever seen.
Across the street at the Mitsukoshi food hall are these perfect red and white strawberries.
And farm fresh greens, sprouts and radishes.
 That we hand carried back to HK to prepare.
Japanese Radish Salad
makes about 1 cup as a side dish or as a topping for salad greens

INGREDIENTS:
1 cup chopped Japanese radishes
1 tbsp grapeseed oil
1/2 tsp sesame seed oil
1/4 cup rice wine vinegar
1 tsp sugar
1 tsp coarse salt
1 tsp chopped mint leaves (optional)

METHOD:
1. Place chopped radishes in a glass or other non-reactive bowl.
2. Combine remaining ingredients and mix well.
3. Pour over radishes and gently fold in.
4. Cover with plastic wrap and refrigerate for at least 30 minutes before serving.

Friday, October 30, 2015

brown velvet cake

For those who love the chocolaty airiness of a Red Velvet cake, but find the "red" in it a little disconcerting, here's a satisfying substitute without that unpleasant carmine/cochineal aftertaste.
Brown Velvet Cake
recipe adapted from The Hummingbird Bakery Cookbook
makes one 6 inch round double layer cake and 9 cupcakes
(also makes one 9 inch round double layer cake or 30 cupcakes)

INGREDIENTS
Make the cake:
2 1/2 cups all purpose flour
1 tsp salt

1 stick (1/2 cup or 113g) unsalted butter, room temperature
1 1/2 cups sugar
2 eggs, room temperature

5 tbsp unsweetened cocoa powder
1 tbsp pure vanilla extract
5 tbsp water

1 cup buttermilk

1 tsp baking soda
1 tbsp distilled white vinegar

Decorate the cake:
1 cup chopped strawberries
1 cup sliced strawberries
1/2 cup blueberries

METHOD:
1. Preheat oven to 325F (163 C). Grease and line cake pans and muffin tins if using.

2. In a small bowl, sift or whisk together flour and salt. Set aside.

3. In a large mixing bowl, beat together butter and sugar until smooth and fluffy. Add eggs one by one and beat until well combined.

4. In a small bowl, combine cocoa, vanilla and water to make a thick paste. Add to the batter and mix well until combined.
5. Mix in dry ingredients in three parts, alternating with buttermilk. Beat on high until smooth. Combine baking soda and vinegar in a separate dish and then mix in.

6. Pour batter evenly into the cake pans or fill prepared cupcake liners half full. Bake cakes for 30 minutes or 12-15 minutes for cupcakes (until a skewer inserted into the cake comes out clean). Rotate pans halfway through baking. Let cakes cool in pans for 20 minutes before turning out on a wire rack to cool completely before frosting (about 1 hour).

7. Make the frosting. For cupcakes, frost as desired.

8. For a cake, mix half of the frosting with the chopped strawberries. This will be your cake filling. The rest of the frosting will be your cake topping. Once the cakes are cool enough, trim them with a serrated knife so that the tops are flat. Place one cake layer on a serving plate. Spread the strawberry filling evenly all the way to the edges of the cake. Place the second cake layer on top and spread the rest of the plain frosting on it. Decorate with the remaining berries. Chill in the fridge until ready to serve.

Wednesday, September 23, 2015

homemade cheesecake

A good New York style cheesecake, that is smooth, creamy and crack-free, can be easy to make if you remember these few tips:
- don't use light/low fat cream cheese and sour cream
- do make sure your cream cheese and eggs are at room temperature
- do grease and line your springform pan with parchment paper
- don't overbeat your batter
- don't put a warm cheesecake in the fridge
- do chill the cheesecake uncovered for at least 4 hours
Homemade Cheesecake
recipe adapted from TheKitchn
makes one 9 inch cake

INGREDIENTS
For the crust:
2 cups ground graham crackers (12 pieces)
1/2 stick (1/4 cup or 56g) unsalted butter, melted

For the cake:
1 lbs (2 x 8 oz bricks or 1.8 x 250g bricks) cream cheese, room temp
1/4 cup sugar
1/2 tbsp cornstarch
1/4 tsp salt
1/4 cup sour cream
1 tsp lemon juice
1 tsp vanilla extract
2 large eggs, room temp

For the topping:
2 cups sour cream
1/8 cup sugar
1 tsp vanilla

METHOD:
1. Preheat your oven to 350F (177C or 170C Fan). Grease the sides and line the bottom of a 9 inch springform pan with a parchment round. Set aside. 

2. In a small bowl, make the crust by combining the ground biscuits and melted butter together. Dump the mixture into your prepared springform pan and gently shake to spread the crumbs. Gently use the flat bottom of a drinking glass to press the crust evenly into the bottom of the pan.

3. Bake for 8-10 minutes until the edges brown. Transfer the pan to a cooling rack.
4. In the mixing bowl of your stand mixer, make the cake by mixing the cream cheese, sugar, cornstarch, and salt on medium-low speed until the mixture is creamy and no lumps of cream cheese remain.

5. Mix in the sour cream, lemon juice, and vanilla and beat on medium-low speed until combined and creamy.

6. Mix in the eggs one at a time and beat each one until completely blended.

7. Stir and scrape down the beater and sides of the bowl with a spatula. Make sure everything is incorporated. The finished batter should be thick, creamy, and silky. Pour the batter over the crust and spread the batter in an even layer against the sides of the pan.

8. Put a tray or shallow heat-proof bowl of water on the lower rack of the oven. Place the cheesecake on the rack above and bake for 30 to 35 minutes until the middle is still slightly wobbly. While the cheesecake is baking, make the topping by combining the sour cream, sugar and vanilla.

9. Remove the cheesecake from the oven and gently spread the sour cream topping evenly over top. Return the cheesecake to the oven and bake for another 5 minutes.

10. Remove the cheesecake from the oven and transfer to a cooling rack. Run a knife around the edge of the cake and cool completely at room temperature for another hour.
11. Chill the cheesecake in the pan uncovered for at least 4 hours or up to 2 days in the refrigerator.

12. When you're ready to serve, release the springform side from the pan and remove. You can serve the cheesecake right from bottom of the pan or slip a large spatula under the parchment paper and carefully transfer the cheesecake to a serving platter. Top cheesecake with your desired topping and serve.

Wednesday, July 15, 2015

cherries and berries

Rustic Cherry Pie
makes a 9 inch pie

INGREDIENTS
Pie Crust:
1 unbaked double 9 inch pie crust (Martha Stewart's Pate Brisee)
1 egg yolk mixed with milk or cream
sanding sugar (optional)

Pie Filling:
1/4 cup corn starch + water to make a slurry

3/4 cup water
1 tbsp lemon juice
1/2 cup sugar
pinch of salt

6-8 cups stemmed and pitted Bing cherries (approx. 2 lbs)
1/4 tsp almond extract (optional)

METHOD:
1. In a small bowl, dissolve cornstarch with some water and mix until smooth to form a slurry. Set aside.

2. In a large sauce pan over medium high, add water, lemon juice, sugar, salt and any juices accumulated during the pitting process and bring to a boil. Whisk in the cornstarch slurry and stir consistently for about thirty seconds. Mixture will be very thick and gloppy. Fold in cherries and almond extract if using. Transfer mixture to a small bowl and let cool. Place in refrigerator and chill until cold or overnight.

3. Roll out pate brisee for bottom pie crust. Place dough on pie plate and trim to 1/2 inch overhang, folding under to thicken edges. Roll out pate brisee to make lattice strips (make strips 1 inch longer than pie plate). Place on a baking sheet lined with parchment. Freeze both until ready to use.

4. Preheat oven to 425F and move oven rack to the lowest setting.

5. Pour chilled filling into bottom pie crust. Make woven lattice top. Brush with egg wash and sprinkle with sanding sugar. Cover pie crust edges with foil.
6. Bake at 425F for 25 mins, then 350F for 35 mins. Remove foil for the last 10 mins.

7. Set pie on a cooling rack and let cool for at least 1 hour or more before serving to let juices collect.
 
Variation:
*You can halve the recipe and make a cherry and blueberry (or any seasonal berry) cobbler.

Monday, September 22, 2014

here there everywhere

It's fun and interesting to see how produce ends up on our tables. Last summer, we visited some table grape farms in Central Valley, CA. One of the largest producers in the region is Sun World and we got a chance to see the labour intensive process it takes to get grapes from vineyard to distribution. And now this summer at a supermarket in Toronto, we see the product at the next stage, ready for the consumer on the retail shelf. These grapes have trucked quite the distance to get here.
Beautiful Hass avocados while we were visiting St. Louis, MO. They are just a lovelier shade of green when they don't have fly to HK.
Back in HK, it's back to business with 3 different food shows occurring during the same week.

It's also Alaskan King Salmon season and we are fortunate to nab one. It was over 14 lbs and just barely fit on our counter.
Arrived by air and super fresh.

Wild salmon really does taste so much better than the farmed variety.
Next week we're expecting a shipment of these baby rainbow carrots from CA. The colours are amazing.

Sunday, August 31, 2014

farmers market

We were in Toronto for part of the summer and the lovely part about being in North America are the really great farmers markets.
Summer's bounty of really fresh organic baby beets.
Ontario strawberries.
This mushroom seller was really friendly and an abundance of knowledge of just about every type of mushroom there was.
He was a really good salesman and we walked away with 4 different varieties.
I just loved the stall where they prepackaged washed and chopped organic kale grown just an hour or so away.
 
And nothing welcomes you to summer in Canada like a big tall Bloody Caesar.

Monday, March 17, 2014

jam with tea

These cookies are incredibly delicious, addictive and great with afternoon tea. Easy and simple, especially if you have little ones in your household. This is a great rainy day activity, with little mess and clean-up.

Jam Cookies
recipe adapted from the BBC GoodFood
makes 3 dozen cookies

INGREDIENTS:
1 and 1/3 cups (200g) self-raising flour
1/2 cup (100g) superfine or caster sugar
7 tbsp or 3.5 oz (100g) cold butter
1 egg, beaten
4 tbsp jam of your choice (I use whatever's in my fridge and this time there was strawberry, raspberry, blueberry and orange marmalade. You can also substitute in chocolate chips, peanut butter, dried fruit or nuts)

METHOD:
1. Heat oven to 350 F (170 C).

2. In a food processor, pulse the flour, sugar and butter together until the mixture resembles coarse breadcrumbs. You can also do this by hand in a large bowl with 2 knives. 

3. Mix in lightly beaten egg to form a stiff dough.

4. Shape the dough into a tube, about 1.5 inch (3 cm) in diameter. Wrap in parchment paper and freeze for 20-30 mins. 

5. Using a sharp knife, cut the dough into 1/2 inch (1 cm) thick slices and place on a lined baking sheet. Leave space between the cookies as they will expand, almost double in size, when baking.

6. Make a small indentation in the middle of each slice with the end of a wooden spoon (little kids can use their fingers) and drop a tsp of jam (or topping of your choice) in the centre. 
7. Bake for 10-12 mins until slightly risen and just golden. Cool on a wire rack.
Cookies will keep up to 1 week in an airtight container or freeze up to 1 month.

Monday, February 3, 2014

2014 and the year of the horse

It's a new year and also the year of the horse! We're back with some seasonal fruit from down under:

Australian lychees - sweet, juicy, and a smaller pit than their grown in China counterparts.
 Tasmanian cherries.
 Big, ripe and sweet Australian mangoes.
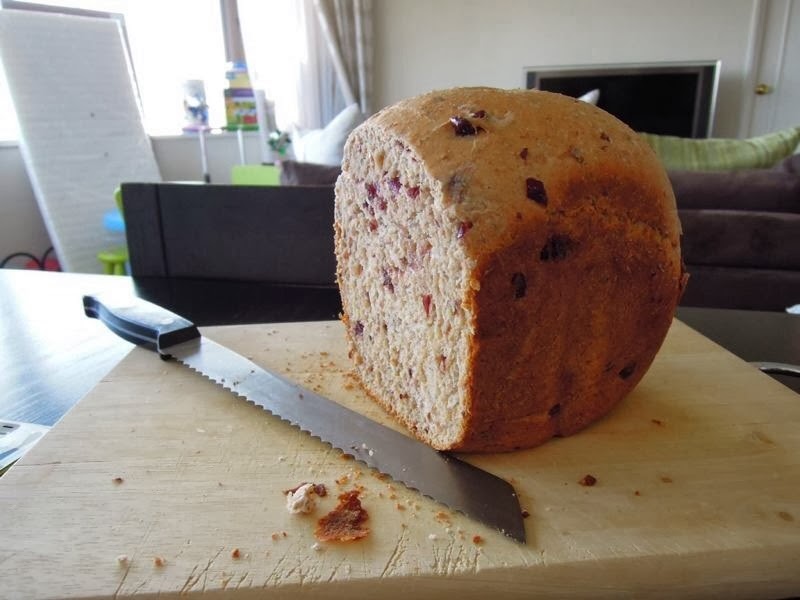
Is there anything better than waking up to the smell of freshly baked bread? We love love love our new breadmaker! And we love experimenting with different flours and ingredients...
...of course sometimes those experiments don't turn out so well. This was suppose to be pumpkin coconut bread.
Attempt number 2 yielded much better results.
This Honey Oat and Cranberry one is fast becoming a favourite in our household. The recipe makes a 1 lbs loaf. Set your breadmaker to the regular setting with a light crust. Ingredients must be added in the following order:
3/4 cup + 2 tbsp water
1 1/4 cups bread flour
1/2 cup whole meal bread flour
1/2 cup quick cooking oatmeal
3 tbsp honey
1 tbsp dry milk
1/4 tsp salt
1 tbsp butter
1 tsp active dry yeast
1/2 cup cranberries
1/2 cup pecan pieces
US Barron Point oysters are at the peak of their season now. Have these giant oysters raw or lightly steamed and topped with minced garlic, green onions, cilantro, sizzling vegetable oil and light sodium soya sauce.
Our langoustines were featured in the January 23rd issue of SCMP's 48 hours magazine.
New comer on the restaurant scene Fish & Meat, serves them grilled and lightly dressed to bring out their natural sweetness and flavour.